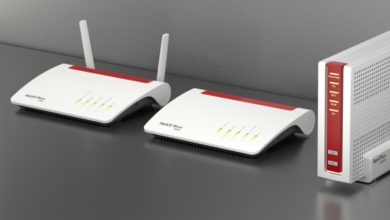
Without any worries, you can add the Netgear Signal booster to your home network. It simply enhances the wifi range to your connection without sacrificing speed. Moreover, it helps to stretch the network connection so that you get the best wifi range. By boosting up its speed it can access those corners as well where your regular router can’t reach. Without smashing your budget it improves the existing speed of your home network. You can also call this Netgear signal booster, wifi booster, wifi repeater, or a range extender.
The Netgear wifi extender adds more internet coverage to your home connection. Simply, you need to connect with the netgear_ext wifi name so that it can connect to your wireless device, and then you will access it anywhere anytime in the house. Moreover, the Netgear extender is compatible with all kinds of wireless routers as well as wireless devices. Along with that, it has three versatile modes that you can adjust by considering the areas.
Troubleshooting the Netgear Signal Booster issues
Yes, you can call the Netgear Signal Booster a unique device, which has a lot of features: but along with this, it also comes with some issues to the users. So, users of the Netgear extender face some issues with the device such as they are unable to find the 5 GHz of the existing network name and wherever they try to connect to it, it automatically disconnects. Also whenever their extender lags, they don’t know how to update the firmware of the device. Sometimes, the LED light is blinking and you don’t know the meaning of the blinking of the LED light. So in this section, we’ll try to solve these kinds of queries and provide a worthy solution.
Unable to connect to the existing network name of the Netgear extender?
If you’re also unable to find or detect a 5 GHz wireless network in order to connect to the host router and the extender device then try this solution. Prominently, you need to relocate the position of the device. Place the extender closer to the wifi router. Therefore, log into the host router, and after login, tap on the wireless section to access the wireless settings.
Now simply click on the wireless 5 GHz network to access the settings of the channel. In case the router is set to auto mode or its channel range is from 100 to 140 then change the channel connection and make sure it is between 141 to 161. If your channel suggests raising the channel then fix the intermittent connections and then click on the apply button when the settings will complete.
After that, reconnect the range extender to the 5 GHz channel and check for the connectivity that it has been improved or not.
What does the blinking of the Netgear extender LED mean?
As you know, the LEDs indicate the current status of the wifi connection between the host router or the device that is connected to it. When your wireless device is getting poor signal range the extender’s LED starts blinking for two minutes.
Especially when you join the connection for the first time. When there is a blinking arrow LED then you need to alter the position of both the wireless devices. Then no arrow light is blinking then you are getting a good wifi signal. When the Netgear wifi extender disconnects to a stable connection then the left arrow starts blinking. If the right arrow is blinking then you need to change the position of the client device.
Failed to accomplish the installation setup process of the Netgear signal booster?
Due to some reasons, the users are not able to complete the setup process of the extender. Then in that situation, it will recommend updating the firmware of the device. After the setup, the Netgear extender will not let the user change the settings. So by upgrading the firmware of the device you get the new version until the initial setup has been completed.
So first of all, connect the host router or gateway directly to the computer device and then install the new version or firmware of the device. After that, connect the computer and type mywifiext.net into the address bar and then the login screen will appear. On the login page enter the login prompts in which the username is admin and the password is also admin. Thereon, click on the login button.
After that select the Maintenance section and click on the firmware update of the device. Next, is to browse so that you can install the new file from the internet. Click on upload and now you have the latest version of the Netgear wifi booster.
Simple Configuration Guide of the tp link archer c5400 With PC